Archive for the ‘model railroading’ Category.

A Little Bit of Model Railroad Progress

It has been a while since I blogged on my model railroad but unfortunately real life intervened and cruelly prevented me from working on my hobby for a while.  I have been making progress recently and thought I would post what I have been working on.  Believe it or not, there are one or two readers who actually write me for updates.

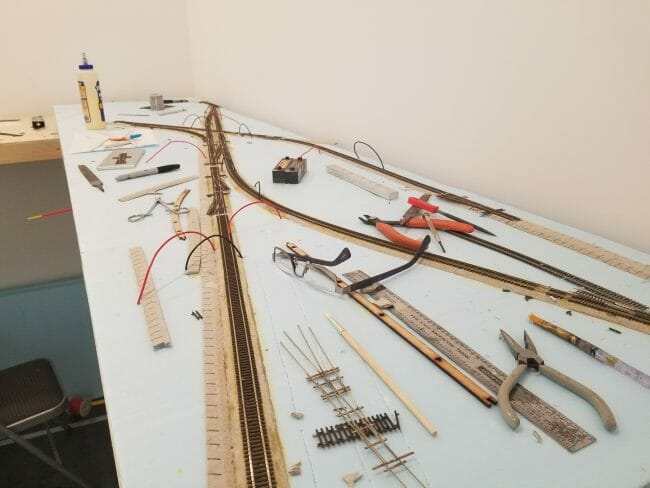
One thing I can do even when I am busy is make progress hand building turnouts.  These are some small #5 turnouts built with code 40 rail (perfect for eyesight destruction).  No way I could to this without the fabulous Fast Tracks construction jigs.

I built the main line out of code 55 flex track and am hand-building all the sidings and branch lines with code 40.  This lets me get the main line up and running fast while still being able to hand build some track, often the track closest to the front of the layout.  Below is the code 55 flex track main line after some test painting.  The one thing I do not like about flex track is that it always looks so uniform.  Even on good mainline track the rail and ties vary a lot in color, so I spray paint a base coat and use brushes to hand paint individual tiles and rail sections different colors to get some variation.

The switch in the foreground below is the first code 40 hand built track I have put on the layout.  It is a bit of a pain to join code 55 to code 40, so I wanted to experiment some.  Eventually I inserted a code 55 rail joiner in the mainline track, and the crushed the other end flat and soldered the code 40 rail to the top.  With some trial and error, this got both the rail tops at the same height.  I really love the look of real wood ties and the color variation you get naturally, which I accentuate some.

The biggest recent progress was I painted the back drop.  Since this is Phoenix I wanted some low haze but no clouds, so I used the tried and true method of blue at the top of the background and white and the bottom and blending them in between.  Came out pretty well, though this picture does not really do it justice because the lighting is not quite right yet.  I need to try it with a better camera.   The biggest problem I had was a classic Phoenix problem where the paint was drying too fast.  One of the hardest problems is that the Phoenix sky on certain days is so deep, deep blue that it looks unrealistic, even in real life, so I did not use the actual color for the top of sky that I see from my front yard, I backed it down a bit.


Oh, you can also see that I have put in the lighting.  As an experiment I used led light strings.  This avoids the directional shadow problem but I am not totally convinced I am happy with it yet.  I also have fluorescent lights installed for night effects, though I still struggle with the OBA / fluorescent paper problem here.  Anyone who has a source for matte (not gloss) OBA-free photo paper that is not too think (I often have to bend and shape the paper for projects) can certainly email me.   Paper models like these are more popular in the UK than in the US, but I have come to really like them in certain applications.  They just don't look good in night scenes when brick walls glow under black light.

In the plan I have locations vaguely blocked out for industries but I had not yet tested the sites against actual buildings I have in inventory or would like to put in.  Below I have a half-built grain elevator I was testing locations for.

That's it for now.  I am starting my big building project which is a scale refinery.  We actually don't have a refinery in Phoenix (closest is Yuma I think) but I worked in one years ago and love the look of them, especially lighted at night, so dammit I am going to have one.

This is Genius

Maybe This is Why Model Railroading is Dying

I am a long-time model railroader (yes, I need to post an update soon) but the hobby is basically dying.  It is just not relevant to young people any more.

Maybe it's because no one produces awesome starter train sets any more like these from the 1980's.

Model Railroad Update #2

Yes, I know you are excited, because it is time to document progress on my model railroad.  In the last episode I had build most of the benchwork and was starting to lay out the track.  Since then I have made a fair amount of progress.

So as we were saying last time, I printed the track plan full size, and then traced the lines onto the foam below using a pounce wheel, a sewing tool that looks like a spur.  You can see below that the traced lines were a bit wavy so I thin used an 8 foot long straight edge and a sharpie to draw the final centerlines for the track.  Then, I started putting down the sub roadbed, which are pre-milled pieces of homosote.

I wanted to hand lay some track, but I also wanted to get started and have some basic track up and running, so I have decided to use use code 55 flex track for the main lines and to hand lay code 40 track for the spurs, branches, and yards.  You can see below I am starting to lay the mainline flex track.  As mentioned in the last episode, I started from the crossings in the distance and started working outward from them in all four directions.

Below, more progress.  You can also see wires poking through as I start the tedious process of wiring power to all the track.  Also in the foreground you can see a code 40 turnout I built.  I am using it to figure out how to do the transitions from code 55 to code 40 track.

At the same time I am starting to build the turnout controllers.  I will be using the FastTracks bullfrog control, which is basically a manual control using flexible control rods.

At this point I realized I should have really mounted the backdrop before I started laying track so I paused and got the backdrop up.  I have used masonite before but it is really heavy.  This time I used 0.09" thick styrene sheet.  There are lots of vendors on the Internet (people use the large sheets for signs) and I was able to order sheets cut to 24" x 8 feet.  I then had to splice two together.   I used a 6" wide piece of styrene and plastic weld (bought a big can from Amazon).  It was sort of awkward, particularly to butt them exactly square.

Here it is starting to go up.  I screwed thin hardwood shims into the joists, and then glued the styrene to the wood with E6000 (I tested liquid nails but the joint was not very strong).  I put in screws to hold it at the very top and bottom.  The bottom ones will be hidden by the scenery and the top by the upper valence.


It turned out that near the corners, the shim spacing was not close enough.  I had to slip some extra shims in from above after it was installed to get the backdrop reasonably flat.  In retrospect, this was a LOT easier than masonite, though masonite is stiffer and would not have needed as much support to be flat.

Why not just paint the walls, you might ask?  Well the styrene sheet is a lot smoother even than drywall, but the payoff is really in the corner.  Here is the corner with and without the sheet.  Sky does not have corners.


The next step was to start on the wiring.  I find the wiring to be extremely tedious, but it is easier for this layout than on my past efforts because the benchwork is relatively high so I can sit in a chair and work on the wiring underneath.

Thank god for suitcase connectors, it makes wiring leads to the bus wire way easier.  And here is the growing proliferation of switch machines.


And the payoff - the first train!


Model Railroad Update

I can hear the reaction now:  Finally a break from free speech controversies and economic policy so we can get on with Coyote's promised increased focus on the world's geekiest hobby(tm).  So here is what has been happening on the new model railroad (in my tiny, but dedicated, hobby space)

I finished the main body of the railroad.  The two lines that cross at a junction in this section will actually continue around the walls in a loop, but I will add those narrow shelves later.  I added 1/8-inch lauan plywood on the frame.  In the lower left on my desk I am finishing the double crossing which effectively acts as the keystone of the layout, both visually and in construction.  I will lay that first and work outwards.

I use 2" foam as a base.  This is a good approach for modeling rail in the Phoenix area, which is largely flat in the areas I am modelling, but allows some undulations, washes, and canals to be easily carved out.

I printed the skeleton of the track plan in 1:1 scale and laid it out where it is going to go.  You can see the junction in the distance.  I did not like some of the aesthetics and wall spacing and building locations, and altered the track plan some after this test.  The next step is to reprint the full track plan and transfer it to the foam.  I do this using an older (sewing) pounce wheel, which I can run over outlines in the plan and it leaves a series of dots in the foam.  I say an older pounce wheel because the one I have looks like a very pointy spur, but my wife's new ones are not nearly as pointy and don't really work for this application.

After that, I will be to start laying down homosote roadbed for the main lines and start laying track, working out in all four directions from the junction.  As I do so, I will mostly follow the plan but I tend to adjust exact locations of turnouts and sidings as I go.

Must Link

Frequent readers will know why I must link this.

Great Model Railroading

For those of you who, when I mention model railroading, think of Lionel trains on a grass mat with a few plastic buildings, check out some of the examples on this site.  In particular, you can't get a much better introduction to fine model railroad craftsmanship than the work of Karl Osolinski.  Enjoy.

Perhaps No Longer the World's Geekiest Hobby

I make no appologies for how my geeky model railroading hobby.  But here is Rod Stewart, fellow model railroader, standing up for the hobby:

So now TJIC will have to go scrambling through his back issues of Anvil Weekly to see if maybe Katy Perry made the cover.

Incredible Thuggery, Courtesy of the Florida State Government

I had a real zoo of a week last week - one of those stretches I have every once in a while in business where new items were being tossed into my queue far faster than I could take care of them.

One of the most amazing was courtesy of the state of Florida.  Almost exactly a year ago, I submitted some backup data on my Florida revenues in 2006 to an auditor for sales taxes.  Such audits are entirely usual and routine (if irritating) and come up with some regularity.  There was no way the auditor could have figured out my tax submission from what I initially sent him - I would have to spend time explaining what different categories in my revenue reports and GL meant.  Further, I had data on seven locations which are divided in the tax reports into two county reports, but he did not have the data for which should go to which.

Well, I never heard from the guy for a whole year to clarify these issues.  Not sure what he was doing, but he was probably screwing up somehow, because on Friday his supervisor called me and told me that the statute of limitations was almost up on 2006 and they needed to complete the audit.  To this end, the auditor had submitted to her some mess of a set of numbers (see my comments above, he couldn't have done a correct job no matter how competent he was since he never asked me for all the information he needed).  I can see the guy rushing around trying to cover his ass having probably forgotten about it for a year.  Anyway, I told the lady that the statute of limitations was her problem, not mine, because her employee initially contacted me a year ago and had been sitting on the case all that time.

Well, I guess I was naive.  It turns out the statute of limitations is in fact my problem in the power imbalance that exists between me and the state of Florida.  She told me that, admitting she had no basis for doing so, she was going to file a lien against me for $40,000 in unpaid taxes as a "placeholder" to get in under the statute of limitations.  Yes, this would trash my credit and my legal standing and cause me no end of problems having a government lien on my company, but it would circumvent the horrible situation that when they actually did the work they should have done a year ago, I might owe taxes they could not collect.

Of course I told her this was BS and of course that got me about nowhere.  After a lot of time, I got one concession.  If I could prove I was clean by Monday, they would not issue the lien.  Well I spent all Friday, Friday night, and Saturday working up the analysis that is supposed to be their job, working on a 1 business day deadline because they had pissed away 250 business days sitting on my case file.  Completing the analysis, I calculated I under-paid taxes by just under $7.  We will see on Monday if I am able to battle back against this absurd thuggery.  By the way, we are being audited everywhere by local governments hoping to dredge up a few pennies from the couch cushions.  It is taking so much of my time that I actually chose to back off of bidding on a couple of new projects -- no time to spare.  So much for stimulus.

On the bright side, I have a lot of good stuff saved up to blog but I did not feel like it on Sunday.  Instead, I spent some time soldering switches and other trackwork on my n-scale railroad.  Made good progress, only about 3 more switches left to build on this module (the switches below are obviously before painting and adding wood ties.  Examples of finished work is here).

Update: By the way, I operate in red states and blue states and cannot detect any real difference in how arbitrarily I am treated by the state bureaucracy (with the exception of California, which stands alone at the top of the list of state bureaucracies that are a pain to deal with).  They differ in laws and tax rates, that often make red states more hospitable, but their bureaucrats are all about the same.

One Lab Left Out

Glen Reynolds linked this gallery of 30 awesome college labs.  My favorite at Princeton was our Junior year mechanical engineering course which was basically interfacing micro computers to mechanical devices  (which was a non-trivial task in 1983).  There were two one-semester courses.  The first was mostly software, and involved programming an s-100 bus computer in assembly language to do various things, like control an elevator.  My final project was a put one of the first sonic rangefinders from a Polaroid camera on a stepper motor and built a radar that painted a blocky view of its surroundings on a computer monitor.

But the really cool part for me was the second semester, when it was software + hardware.  We had to build a complete electronics and mechanical package to perform an automated function on ... a very large n-scale model railroad.  Well, readers of my blog will know that model railroading is my hobby anyway.  My team built a coal loading facility where the train was stepped forward one car at a time and a hopper filled each successive car to the right level with coal (or actually little black pellets).  We had sensors to be able to handle certain problems the professor might throw at us, like a car that was already full, cars of different sizes and lengths, etc.  That lab with the big model railroad was easily my favorite.

In retrospect, I almost miss programming in assembler code, trying to cram the code into 4K EPROMS, etching my own circuit boards....  Almost.   Now my only use for circuit boards is to shear them into strips to act as railroad ties when I hand-solder track work and my only use for etchant is weathering scale sheet metal to make it naturally rusty.  Pictures of the latter in a few weeks.

Layout Progress -- Staring at Grain Elevators

I had wanted to make more progress this weekend, but we had an astoundingly rare tragedy at one of our campgrounds (family got hit by lightening) so handling that had to take priority. But before that came awful bit of news, I did make some layout progress. Mostly I was tearing my hair out trying to weather a grain elevator, which turn out to be a pain to duplicate, unless one wants to paint it brand new and all white and that is never the look I go for.   They tend to be chipped, with horizontal weathered streaks as well as vertical staining. This is where I am so far. It looks better in person, but for just that reason photos are a great way to exaggerate modeling problems. In this case, I have too much of a cross-hatched effect on the tower and need to work on that.  Push comes to shove I will repaint the tower white and start over.

On the positive side, I finished my first pair of handbuilt switches using N-scale schedule 40 rail.  This was a ton of work for something they sell in the store, but the results are worth it, I think.  The switches are #8, built from Fast Track jigs, soldering the rail to PC board ties every 3-5 ties and using stained wood ties glued to the rail with Pliobond for the rest.  Rail is painted Floquil rail brown with hand-painted rust streaks.

Layout Progress: Base & Initial Trackwork

This is part of a recurring series on the evolution of my n-scale switching layout.  More after the break...

Continue reading ‘Layout Progress: Base & Initial Trackwork’ »

Layout Update - Track Planning

Rather than starting a new blog,  I think I warned you that I would be doing model railroad layout updates here as a reference for fellow hobbyists.  You are welcome to blow right on past if the hobby is too geeky for your taste.

I have completed Version 1.0 of the track plan for an 18" by 9-foot shelf-style switching layout in N-scale.  I used the 3rd PlanIt CAD program to do the design.  Click to enlarge:

The layout has a number of features I wanted

  • Staging area (not shown, around a corner to the left)
  • Interchange with 2 other railroads
  • Small yard
  • Lots of industry space
  • Space for urban scenery

The layout is an imaginary short line switching urban tracks in the Phoenix area, interchanging with both the Union Pacific and BNSF, set in modern day or perhaps backdated to pre-merger ATSF.  I have spent several weeks photographic rail lines and industries in the area and have a good idea of the look and feel I want.  I am going to build it in two modules which split just right of the diagonal interchange line.

Because I am a masochist, I am using code 40 hand-laid track with hand made turnouts using Fast Tracks fixtures.   While newer code 55 rail is a big improvement over older rail, it is still out of scale.  I may make the diagonal main line crossing at the junction code 55 just to emphasize the difference between main and branch line -- also because I don't really like building crossovers by hand and Atlas has a nice code 55 45-degree crossover I can use.

I am not going to run the largest modern diesels or any long passenger equipment so I am going to try to get away with #5 turnouts, except on crossovers where I will use #8 if I can make them fit.  I am still debating some issues like turnout control, so I will leave that for later chapters.   Minimum radius can be big - 18" or more, except on the interchange track because it has to tuck behind the backdrop.

You will see I have already planned some mirrors into the design.  That was something that always got visitor's attention on my old layout -- tracks or roads appearing to go on forever.  This time I will use it for the interchange track as well as the yard (a la John Allen).  I am also going to try to double the apparent length of my grain elevator with one.  As always, the hard part is hiding the edges.  The interchange track will be easy, and a highway overpass will likely work on the yard, but I have not yet figured out how to disguise the mirror at the elevator.

This weekend I hope to actually build the base of the modules, using 1-inch extruded foam insulation board glued to 1/4" Lauan plywood.  Stay tuned, I hope to have it all in pictures.

Thanks to My Readers -- The Solution for White Non-Fluorescent Paper

Thanks to my readers, I have cracked the problem of finding white non-fluorescent paper, which I will post here for the benefit of future Google searchers.   At first I tried some natural bond paper, and it didn't fluoresce, but it added too much yellow to the final product.  I was just in the middle of playing with Photoshop to see if I could compensate, when Agesilaus said that this was a concern in archival and art photography and what I wanted was OBA-free paper.  OBA is the term for a class of optical brighteners that fluoresce and are used in most papers, and because they can cause fading, artists and photographers create a market for OBA-free paper.  It can be expensive, like 70 cents a sheet, but since I can put most all the signs and details I need on a sheet or two, that is no big deal.  Here is one source, not surprisingly from the comments, a photography outlet.

Thanks everyone!

PS - TJIC thought the scorpion thing was creepy.  It sort of is, but it beats shoveling snow.

Unexpected Problem - Finding Non Fluorescent White Paper

I am working on the first module in a new N-scale model railroad layout.  In this urban scene, I am using florescent paints of various types under black light to simulate neon and other lighting in night scenes.

I use printed paper in a lot of applications in my modeling - not just for business signs but highway signs, tar paper on roofs, some areas of brick and concrete, small details, etc.  The unexpected problem I am having is finding any white printer paper that doesn't fluoresce under black light (it is the whiteners that are used in modern papers that fluoresce -- in fact one test to see if you have an older document in your hand is to put it under black light).  Stop signs and tar paper roofs of buildings and manhole covers should NOT be glowing at night.

I am told some art supply stores sell non-fluorescent natural white papers, but I have yet to track any down.  I went into the OfficeMax yesterday with a handheld black light (we all own these in Phoenix for finding scorpions in our houses at night, as they fluoresce too, but that is another story).  The good news is that Homeland Security did not bust me for odd behavior, but I did not find anything that would work.  I actually have some clear paint that is a UV block, but it dries glossy, so right now I am painting a layer of the block and then a layer of matte clear coat.  This does not look entirely right, and is a pain to do for every item.

On the off chance one of you has an idea with this ridiculously niche bleg, fire away in the comments.

Update: Solution found! Thanks to commenter Agesilaus

Coolest Stuff I Have Worked With In A While

Electro-Luminescent wire.

el-wire-light

I am a little late to the game on this stuff -- apparently hobbyists have been using it for crafting.  For example, who wouldn't want a Tron outfit?

To date, I have mostly sheltered readers from the geekiest of my hobbies: model railroading  (Yeah, I know what you are saying -- how can anyone who spends hours a day at a computer writing on arcane bits of business and economics issues possibly be anything but cool?)  This may soon change, as I am starting a new N-scale layout and I will probably inflict some in-progress photos on you folks.  To get an idea just how crazy I am, I build my own track from wood strips and bundles of rail and tiny, tiny spikes -- so we are not just talking about putting the old Lionel out on a green table cloth.

Anyway, for some time I have wanted to build a layout that is primarily meant to be run in the dark as a night scene.  So I am experimenting with a lot of technologies, from florescent paint to tiny LED's to small bulbs to get ideas for various scenes.  The EL wire turns out to be a dead ringer for scaled down neon, so I expect to use a lot in the city part of the layout.

I will leave you with a photo of the layout that probably inspired more people (including myself) into the hobby than any other  -  by the master, John Allen:

s1_020_b4squaw_sep64

If you get intrigued with his work, more photos are here.

I wish I had more pictures of my old work, but they seem to have been lost in a move.  All I have left is a few poor-quality, poorly-scanned under-construction photos of my first layout from years and years ago.

rr3

rr1

Postscript: Can a hobby be geeky if Rod Stewart shares it?  He has built an absolutely stunning layout - one photo below and more herestewart-layout

And yes, the work really is his own, he didn't just pay someone to build it for him.