More Adventures in Photography
I am still trying to figure out how traditional film photographers got great outdoor photos. I struggle with haze and a loss of vibrancy in distant photos, as if the images were photographed through dirty glass. Maybe filters? More vibrancy in the film (I know that drove a lot of Kodak users to Fuji)?
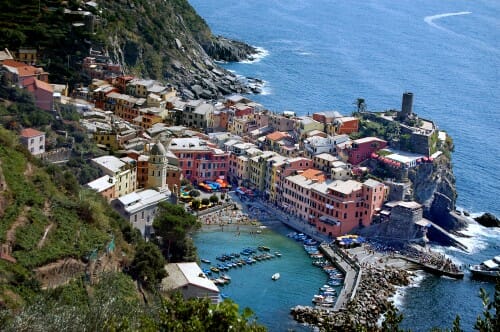
Anyway, I don't have to rely on film, and can fiddle around with Photoshop until I get things right. I used it in this image to lighten some dark areas and then eliminated the haze effects by painting the whole image with a low-opacity color burn (I used to use a neutral gray for this but I have had better luck using a color with much of the blue taken out (using the RGB sliders in the color selection)). I gave a second helping of the color burn to the buildings only, to make them pop a bit. I try to stay far away from the contrast controls - every photo I have ever ruined started downhill with the contrast control. Instead, I went into each of the R-G-B channels in the "levels" section and fiddled with the distributions a bit, in effect widening the distributions (only a little) to get a tad more contrast.
I think it came out pretty well -- I was at an art show with a guy selling almost this exact same photo from the exact same spot and I think mine compared favorably with his art shot. The only thing I think might have improved it was to get morning light, but I was not going to camp out for 18 hours to do so.
Anyway, this is Vernazza, one of the five towns of Cinqueterre on the Italian Riviera, taken from the fabulous walking trail the connects the five towns. As usual click for enlargement.
On the monitor screen, the colors are perhaps a bit over-saturated but by trial and error it looks great on paper (at least with my printer -- the color variation among printers and papers is really astonishing once you start paying attention to it).
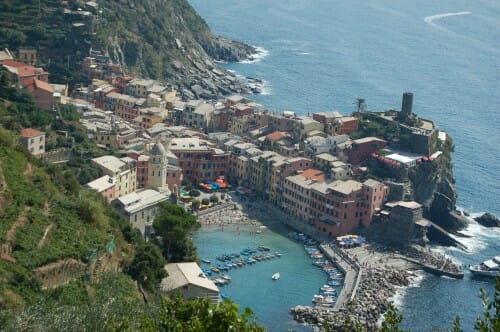
Below, by the way, is the original digital image. If someone can tell me what I am doing wrong (filters, camera selection, etc) to get such crappy original images, I would be appreciative. It looks like I haven't cleaned the lens or something. All I am using is a pretty good quality UV filter (mostly just to protect the lens) on a Nikon D50 with the stock Nikon lens.


I haven't messed around with photographs in a while...but while I was searching for a new camera, my photographing phriend recommended DP Review: http://www.dpreview.com/learn/
Have you tried circular polarizers and/or haze filters? I took a trip to Italy and Greece and found the polarizer really helps.
I haven't altered any of these, many were taken with a polarizer - http://www.flickr.com/photos/29258740@N08/collections/72157606508291835/
The best haze fighter is a polarizing filter. Much of the light from the haze is strong polarized, so it will be mostly eliminated with a polarizing filter.
Post processing it's a bit more difficult to eliminate, but the overall effect is to reduce detail and reduce contrast. So up the contrast, and up the sharpening.
Also, in photoshop, contrary to what you'd think by it's name, "Unsharp Mask" can really make an image pop. It's kind of a local contrast adjustment that enhances edge contrast, though you can go overboard. http://www.earthboundlight.com/phototips/local-contrast-unsharp-mask.html
I *highly* recommend Adobe Photoshop Lightroom. You can accomplish the same thing in seconds, twiddling a few sliders, that it would take minutes to do in Photoshop. The "clarity" slider is effectively an "unsharp mask" - though much better named.
Andrew has your solution. Get a polarizer. They rotate 360 degrees so you can turn it until it filters out the glare and haze.
A must-have for any photographer.
Are you using RAW files or JPG? JPG pictures have in-camera processing applied, whereas RAW files do not. So, similarly to how the film landscape photography pioneers did much of their art in the darkroom, digital photographers process using lightroom/photoshop/etc. I think of it as trying to get exposure and focus right in camera, but using post-processing to get the contrast, white balance, sharpness, etc right. The film greats spent hours upon hours dodging and burning photographs in the darkroom - photoshop is the same thing! The big difference between the greats and the rest of us is that they know where to stop tinkering. ;-)
The key to great landscape and cityscape photography is the time of day the photo is taken. Google "magic hour" or "golden hour". http://en.wikipedia.org/wiki/Golden_hour_(photography). From the shadows in your photos it would appear that they were taken either late morning or early afternoon which results in much stronger and harsher lighting conditions and more dynamic range than the camera can capture. Early morning is usually best because that is when you usually have the least amount of atmospheric haze. HDR methods can help, but there really is no substitute to being on location at sunrise, and wrapping up your shoot by mid-morning.
I've found that most fix-ups in Photoshop begin with use of the "Levels" function. This is not obvious to those of us that spent years using multiple or variable-contrast papers for black and white prints or who fixed up our TV pictures with the Brightness and Contrast controls.
"Levels" is used to expand the narrow range of brightness levels in a hazy photo to fill the full brightness range of your monitor. It is essentially what Ansel Adams and Edward Weston were doing with the "zone system" back in days of yore.
To use it, check the Levels and if there is blank space on the right or left side of the distribution. Move the little triangles in to where the distribution begins and you'll probably say, "why didn't anybody tell me about this?" Shadows/Highlights adjustments let you deal with both bright and dim areas simultaneously. Doesn't always work but when it does, it will amaze you too. After that, you have to do work, separating areas of the photo and working on them individually. Same issue though.
To understand what's going on, though, just look up Zone System. Or pick up an old book on the subject. Nothing has really changed in the last sixty years.
O, and go with the polarizing filter too. You'll find that in the old books too.
What Mike said. You can fiddle for hours in Photoshop and never get it right, or wait for the right hour to take the photo, which while on vacation isn't exactly convenient.
Of course it helps if your camera has a large viewer that is high definition, a la the Iphone 4 viewer.
That way you can fiddle with the polarizer for effect. Haze filters help as well and are not as fiddly,
ie on or off the camera. Slightly older cameras don't have enough definition in the LCD panel or white
out in strong light making judgement as to the effect of a polarizer uncertain. With a 16GB chip you
can just rotate the filter 30D and shoot, then rotate again and reshoot. Helps to know which shot is which though.
In addition to using a polarizing filter, you may want to check what aperture you are shooting with. Generally, you'll find f5.6 - f8 will be the optimal for most lenses, with decent DoF and avoidance of diffraction.
Start with a polarizing filter, especially anywhere near water. This can, depending on the situation, dramatically improve results, at least in my view.